I know I said that I would post this recipe last week, but I'm lazy and you should never trust anything I say.
Anyway, this is the second part of the recipe I started before, the actual chicken part. I'm still deciding if I will include the polenta part too, but I just use Mark Bittman's recipe, and it's really easy. Maybe I'll do something else soon that uses it. I've wanted to try out the recipe for really stiff polenta and make little cakes.
Anyway, on to chicken. I'm excited because today is my oven's debut on this blog! This is everything that you need, including stuff for polenta.
The grape tomatoes are a really great addition in this recipe, so don't forget them. Also, chicken thighs here are a must. Breasts will get too dry, but thighs can take a lot of cooking.
First remember to season the chicken thighs (profusely) with salt and pepper. Add a tablespoon of butter and about a tablespoon of olive oil to a dutch oven. Butter for browning, olive oil for not burning.
When it gets hot, add the thighs, skin side down, in the pan.
Let them cook for about two to three minutes, until you get some nice color on the skin. If you like it really crispy, go for four. Anyway, when you flip them, they should look something like this.
Nice color on the skin, but not burnt. Although, I did burn myself getting this close-up. I really need a new camera.
So, two to three minutes on the other side, then pop them out, put them on a paper towel an drain some of the fat if it looks like there's too much. Also, start preheating your oven to 325.
Whenever I make sauces I like to add onion, and I'm not sure why. If I make a pan sauce and I don't, I always feel like something is missing. Maybe it's because of my ultimate in pan sauces, the sauce for my Pork Chops in Mustard Cream Sauce. I'm just obsessed with it, and I try to make every sauce jutst like it. Anyway, throw in some nicely diced onion, turn off the heat, and let it cook until translucent. The residual heat here should be enough, and I HATE burning onions.
Now the fun part, turn the heat back on medium, take a quarter cup of wine and deglaze the pan.
That just means pour in the wine and stir vigorously, getting all of the chickeniness off the bottom of the pan. It adds tons of flavor and does some of the cleaning for you.
Let the wine reduce by about half, then add in a quarter cup of chicken stock (or water, if you don't have any) and let that reduce by half.
Add in between one and two tablespoons of that great pesto we made before and mix it all in.
It looks really gross, but tastes great. Turn off the heat and taste for seasoning. Add salt and pepper as needed.
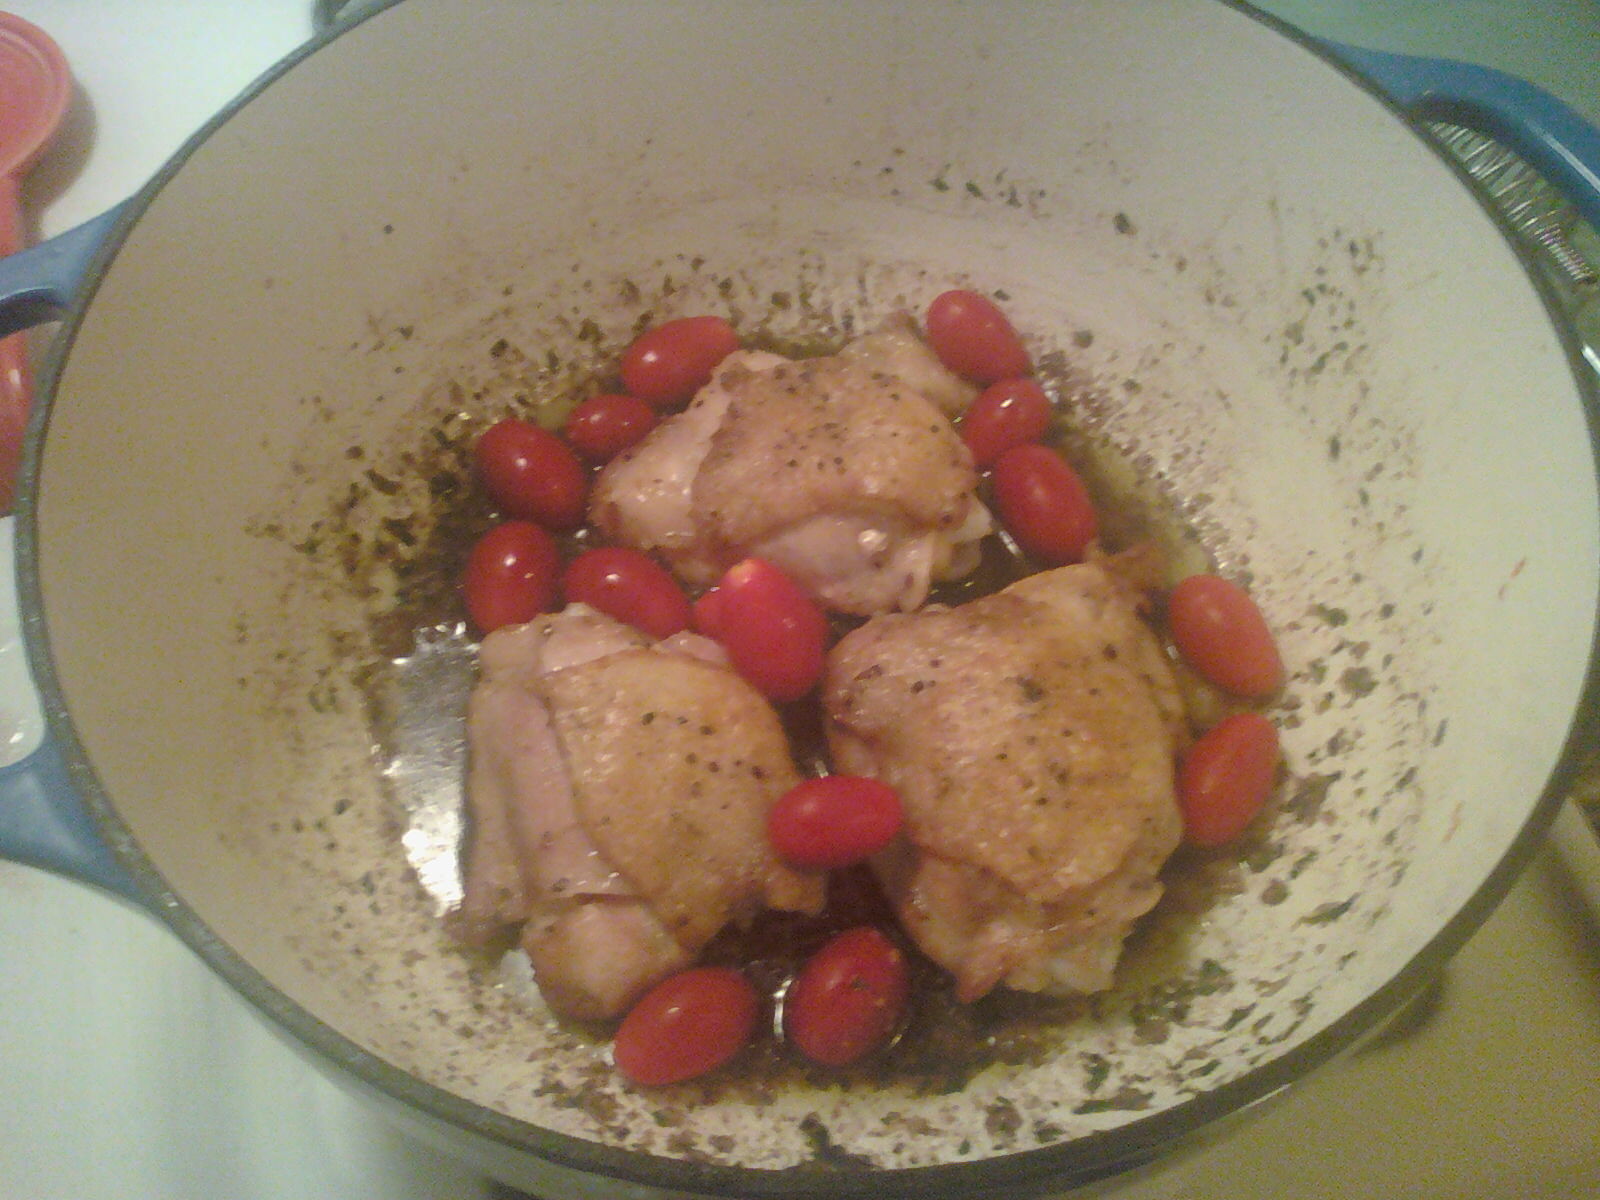
Put the chicken back in, skin side up, and toss in some of those grape tomatoes.
The tomatoes are going to start to burst in the oven and add another layer of flavor to the sauce, not to mention the chicken will let off additional juice/fat. It's going to be sooo good.
Put the top on and get it in the oven for 35-45 minutes, until you feel comfortable with the chicken. 35 was definitely enough for me.
While it's in the oven, you have enough time to make polenta, if you're in to it. Mashed potatoes would also be good, but do me a favor and make a cute presentation.
I tried my best with this one. At least it tasted great. This one's for the recipe book.
Pesto Chicken
3 Chicken Thighs
1/4 cup red wine
1 tbsp butter
1 tsbp oil
1/4 cup chicken stock/water
2 tbsp pesto
2 tbsp onion, diced
1 handful grape tomatoes
salt and pepper as needed
1. Season chicken thighs, and heat butter and oil in a dutch oven. Sear, skin side first, 2-3 minutes per side.
2. Remove to a paper towel, drain some fat if necessary, turn off the heat, and saute onions in residual heat. Preheat oven to 325.
3. Turn heat back to medium, add red wine to deglaze pan and let reduce by half. Then add stock and let reduce again.
4. Mix in pesto, then turn off heat.
5. Add chicken back into dutch oven, skin side up, and toss in grape tomatoes. Place in oven, covered, for 35 minutes.
6. Serve over polenta or mashed potatoes, and most importantly, some red wine.
Showing posts with label chicken. Show all posts
Thursday, September 16, 2010
Monday, August 9, 2010
Project Chicken Leftovers II: Chicken Enchiladas
So, I post today from the confines of my apartment. I'm waiting for a UPS delivery that I'm just hoping will actually come. Anyway, on to leftovers. (DOWN WITH UPS)
We decided last Thursday, that we needed to use all the rest of the chicken in one "fowl" swoop. Sorry for the bad pun. The easiest way to do this, for us, was to make gorgeous chicken enchiladas, based on a recipe found here.
We made a few adjustments and additions to the recipe, and the result was fantastic. It also used almost exclusively things in our pantry: ranch dressing, sour cream, a little bit of mayonnaise. We had to get some tortillas, but that's not too much to ask.
I don't quite remember what the original recipe requires, but we added some drained black beans, a sliced cubanelle pepper (which we got from a local urban farmer: you can find them here), and some salsa.
The insides look gross, but this is definitely a leftover recipe that we will be using again. Sorry for the gross looking pictures, these were the leftovers I ate for lunch the next day.
So, one note on the recipe. You only need the insides of the enchiladas to warm up, so instead of doing the time that the recipe recommends, I suggest reducing it by about 5 minutes. As you can see, we got some burnt cheese on top. Maybe it was just the type of cheese (mozzarella and cheddar... it's what we had in the fridge) we used though.
Also, we weary when stuffing the tortillas, if you put in too much, you will really have a mess on the bottom of the pan.
Enjoy!
We decided last Thursday, that we needed to use all the rest of the chicken in one "fowl" swoop. Sorry for the bad pun. The easiest way to do this, for us, was to make gorgeous chicken enchiladas, based on a recipe found here.
We made a few adjustments and additions to the recipe, and the result was fantastic. It also used almost exclusively things in our pantry: ranch dressing, sour cream, a little bit of mayonnaise. We had to get some tortillas, but that's not too much to ask.
I don't quite remember what the original recipe requires, but we added some drained black beans, a sliced cubanelle pepper (which we got from a local urban farmer: you can find them here), and some salsa.
The insides look gross, but this is definitely a leftover recipe that we will be using again. Sorry for the gross looking pictures, these were the leftovers I ate for lunch the next day.
So, one note on the recipe. You only need the insides of the enchiladas to warm up, so instead of doing the time that the recipe recommends, I suggest reducing it by about 5 minutes. As you can see, we got some burnt cheese on top. Maybe it was just the type of cheese (mozzarella and cheddar... it's what we had in the fridge) we used though.
Also, we weary when stuffing the tortillas, if you put in too much, you will really have a mess on the bottom of the pan.
Enjoy!
Labels:
beans,
chicken,
must try,
pantry cleaner,
project leftover
Wednesday, August 4, 2010
Project Chicken Leftovers I: Curried Chicken Salad a la Ruth
I can't take credit for this recipe. The final (delicious) results are were a combined effort or my girlfriend Alison and our friend Ruth. I had very little to do with this, except the part where I tore apart a whole chicken. It's not as therapeutic as you think it would be, it's mostly just gross.
Chicken salad is a great idea for leftovers, but it can be so boring. Alison and I remembered this one salad that we had once. It was a curried broccoli salad, made by Ruth. We decided that this would be wonderful, so we gave it a shot.
The recipe is simple enough. Take about a cup of shredded chicken, a third cup of broccoli, blanched but still crisp and three slices of bacon which you've cooked very crisp and chopped: combine them in a bowl. Then add a dressing you make of mayonnaise, sour cream (about half and half on those), some sugar, curry powder, and pepper. The salt in this recipe will come from the bacon, but you can add some at the end if you're not sure.
Mix together the dressing and other ingredients, making sure that you coat everything and then throw in a handful of golden raisins (or regular if that's all you have) and a handful of chopped almonds (for the crunch). That's it. Mix it up and let it sit in the fridge overnight and you will have a great sandwich for lunch the next day.
It's even better after two nights in the fridge.
Nom Nom Nom.
Chicken salad is a great idea for leftovers, but it can be so boring. Alison and I remembered this one salad that we had once. It was a curried broccoli salad, made by Ruth. We decided that this would be wonderful, so we gave it a shot.
The recipe is simple enough. Take about a cup of shredded chicken, a third cup of broccoli, blanched but still crisp and three slices of bacon which you've cooked very crisp and chopped: combine them in a bowl. Then add a dressing you make of mayonnaise, sour cream (about half and half on those), some sugar, curry powder, and pepper. The salt in this recipe will come from the bacon, but you can add some at the end if you're not sure.
Mix together the dressing and other ingredients, making sure that you coat everything and then throw in a handful of golden raisins (or regular if that's all you have) and a handful of chopped almonds (for the crunch). That's it. Mix it up and let it sit in the fridge overnight and you will have a great sandwich for lunch the next day.
It's even better after two nights in the fridge.
Nom Nom Nom.
Tuesday, August 3, 2010
This Week is Project Leftover Chicken
Hey guys,
So, I'm in my new apartment now and it has an oven! YES! To celebrate, my girlfriend and I bought a 5 lb chicken to roast (it was on sale). The results were delicious, but that's not what I'm writing about. We were left with a lot of left over chicken, so this week I will be posting some recipes dealing with this problem.
You can look forward to some Curried Chicken Salad a la Ruth, and probably some chicken enchiladas. Anyway, I'll be posting some more soon.
So, I'm in my new apartment now and it has an oven! YES! To celebrate, my girlfriend and I bought a 5 lb chicken to roast (it was on sale). The results were delicious, but that's not what I'm writing about. We were left with a lot of left over chicken, so this week I will be posting some recipes dealing with this problem.
You can look forward to some Curried Chicken Salad a la Ruth, and probably some chicken enchiladas. Anyway, I'll be posting some more soon.
Tuesday, May 18, 2010
Zucchini Love II: Stir fry with Zucchini Noodles
So, my love for zucchini continues to blossom. Yesterday I was pondering what to make for dinner, I had just bought a zucchini, an onion and a red bell pepper from the vegetable market and some chicken from the butcher. I thought about stir fry, but couldn't figure out if I could incorporate the zucchini.
See, to me, stir fry is all about packing in veggies, it keeps me form getting scurvy. Anyway, I suddenly remembered how to make noodles out of zucchini. While the results are far from expert (a real chef would use a mandoline) they are delicious and colorful.
So we start with the veggies, the meat, and some spices. Oh yeah, you can't forget soy sauce. I like that my butcher wrote chicken on the chicken paper. Sometimes I believe that they think I'm stupid.
So, the first step is to quickly marinate the chicken. Cut the chicken in slices and make a marinade out of a little soy sauce, olive oil, salt, pepper and a pinch or two of red pepper flakes. Some ground or grated ginger would also be great here, I just didn't have any.
We'll let the chicken marinate until we're ready to cook it. Now it's the hard part, and the coolest. We need to turn our zucchini into noodles. Get out your potato peeler (or mandoline if you're fancy... I'm not).
Cut off the top (I forgot here) and bottom of your zucchini and just peel off one strip from the top.
Then continue doing this, applying even pressure with your peeler (which I'm bad at) to make long and thin zucchini strips.
Just like that, but I'm sure yours look better. Then stack them and cut them into fettuccine sized strips.
If this picture weren't blurry, it would be really beautiful. The little dark green edge fading to the light green and white of the center, but folded like a piece of pasta. Wonderful food imagery.
Anyway, at this point you'll want to cut your onion and bell pepper in to thin-ish strips. Add some olive oil to a hot pan and toss all your veggies in.
So many bright colors, it already looks wonderful. After about four minutes, add in some garlic and cook just the veggies for another two or three minutes.
Then it's chicken time.
Put in your chicken, including the marinade and stir frequently to mix everything up. It will take the chicken between 5 and 7 minutes to cook. You can leave it on one side for two minutes, then stir everything to flip all the chicken over and leave for another few. The most important thing is that you will accumulate some bits on the bottom of the pan. When you have about two minutes left, add in about two teaspoons of soy sauce to deglaze. You'll thank me later.
Now just serve the results over rice, and enjoy. The dish just looks warm and inviting, but maybe it's just me.
Stir Fry with Zucchini Noodles
1 chicken breast
1/2 medium onion, sliced
1/2 medium zucchini
1/2 red bell pepper, cut in strips
1 clove garlic, minced
2 tsp salt
1 tsp black pepper
3 tsp soy sauce
2 1/2 tbsp olive oil
1/4 - 1/2 tsp red pepper flakes
1. Slice the chicken breasts into a about 1/2 inch thick strips. Combine 1 tsp soy sauce, 1/2 tbsp olive oil, 1 tsp salt, 1/2 tsp pepper and the red pepper flakes in a bowl and add chicken to marinate.
2. Cut the top and bottom off of the zucchini, and with a potato peeler peel off thin strips of zucchini, discarding the first one.
3. Pile strips and cut into strips about the width of fettuccine.
4. Preheat a pan over medium high heat and add remaining olive oil. Saute all vegetables in the olive oil, adding remaining salt, pepper and garlic after a few minutes.
5. After about 7 minutes, add in chicken and all marinade. Stir fry for about 5 - 7 minutes or until chicken is cooked through. With about two minutes remaining, deglaze the pan with the remaining soy sauce.
6. Serve over rice (fried rice is also good here... recipe another time) and enjoy.
See, to me, stir fry is all about packing in veggies, it keeps me form getting scurvy. Anyway, I suddenly remembered how to make noodles out of zucchini. While the results are far from expert (a real chef would use a mandoline) they are delicious and colorful.
So we start with the veggies, the meat, and some spices. Oh yeah, you can't forget soy sauce. I like that my butcher wrote chicken on the chicken paper. Sometimes I believe that they think I'm stupid.
So, the first step is to quickly marinate the chicken. Cut the chicken in slices and make a marinade out of a little soy sauce, olive oil, salt, pepper and a pinch or two of red pepper flakes. Some ground or grated ginger would also be great here, I just didn't have any.
We'll let the chicken marinate until we're ready to cook it. Now it's the hard part, and the coolest. We need to turn our zucchini into noodles. Get out your potato peeler (or mandoline if you're fancy... I'm not).
Cut off the top (I forgot here) and bottom of your zucchini and just peel off one strip from the top.
Then continue doing this, applying even pressure with your peeler (which I'm bad at) to make long and thin zucchini strips.
Just like that, but I'm sure yours look better. Then stack them and cut them into fettuccine sized strips.
If this picture weren't blurry, it would be really beautiful. The little dark green edge fading to the light green and white of the center, but folded like a piece of pasta. Wonderful food imagery.
Anyway, at this point you'll want to cut your onion and bell pepper in to thin-ish strips. Add some olive oil to a hot pan and toss all your veggies in.
So many bright colors, it already looks wonderful. After about four minutes, add in some garlic and cook just the veggies for another two or three minutes.
Then it's chicken time.
Put in your chicken, including the marinade and stir frequently to mix everything up. It will take the chicken between 5 and 7 minutes to cook. You can leave it on one side for two minutes, then stir everything to flip all the chicken over and leave for another few. The most important thing is that you will accumulate some bits on the bottom of the pan. When you have about two minutes left, add in about two teaspoons of soy sauce to deglaze. You'll thank me later.
Now just serve the results over rice, and enjoy. The dish just looks warm and inviting, but maybe it's just me.
Stir Fry with Zucchini Noodles
1 chicken breast
1/2 medium onion, sliced
1/2 medium zucchini
1/2 red bell pepper, cut in strips
1 clove garlic, minced
2 tsp salt
1 tsp black pepper
3 tsp soy sauce
2 1/2 tbsp olive oil
1/4 - 1/2 tsp red pepper flakes
1. Slice the chicken breasts into a about 1/2 inch thick strips. Combine 1 tsp soy sauce, 1/2 tbsp olive oil, 1 tsp salt, 1/2 tsp pepper and the red pepper flakes in a bowl and add chicken to marinate.
2. Cut the top and bottom off of the zucchini, and with a potato peeler peel off thin strips of zucchini, discarding the first one.
3. Pile strips and cut into strips about the width of fettuccine.
4. Preheat a pan over medium high heat and add remaining olive oil. Saute all vegetables in the olive oil, adding remaining salt, pepper and garlic after a few minutes.
5. After about 7 minutes, add in chicken and all marinade. Stir fry for about 5 - 7 minutes or until chicken is cooked through. With about two minutes remaining, deglaze the pan with the remaining soy sauce.
6. Serve over rice (fried rice is also good here... recipe another time) and enjoy.
Tuesday, April 6, 2010
Chicken in a Balsamic Cream Sauce
Holy crap, I really didn't post for the entire month of March. To be honest, I was having trouble coming up with new recipes to try, and I had some pretty bad failures. Mostly, there were problems in executing actually decent ideas. I did, however, manage to make this little gem. It combines the acid of balsamic vinegar with the smoothness of cream to make a delicious sauce, which doesn't curdle!
Anyway, start by taking two chicken breasts, salt and pepper them and pan fry them.
I feel like so many of my recipes start this way. Anyway, while you're waiting gather these ingredients.
Oh, and butter... I forgot the butter. When the chicken is done, melt the butter in your pan (the same one you just took the chicken out of) and then add in your flour. For a good roux, you typically want about equal parts flour and butter. BTW, that's what we just made, a roux.
You want to cook the roux for about two or three minutes, just to get the raw flour taste out of it. Once that's done, add in your balsamic vinegar. It looks like I used about a tablespoon.
Stir it all around and try to get some of the chickeny goodness off the bottom of the pan. Then let it cook down for about a minute. We just need to allow the acid to cook down a bit. It will stop us from curdling the cream later. The fat may also do that... I'm not a chemistry person.
Perfect! Now it's time for the chicken stock. About a quarter cup will do. This is why we made the roux, so that we can get the chicken stock in our sauce to tighten up. See, it all makes sense... right?
Stir that all up and allow the stock to cook down for around 2 minutes.
Look how dark is got after that little amount of time. The balsamic is really integrated in. Now it's time for the good stuff... heavy cream. Just a tablespoon or two is probably good. I may have done three, I don't remember. Cream makes my memory hazy.
Stir all that cream in, and you will end up with something that is a brown-ish color. Not ugly brown though, smooth brown. At the end, I threw in around a half teaspoon more of balsamic, just to give it a bit of vinegar bite. It was worth it.
Damn, I love balsamic vinegar.
Something possessed me to warm up some tortillas and serve this over rice. It was a momentary thing. So, I warmed up the tortillas in the toaster. Just a minute or two on a low temperature.
Hi Mr. Toaster, it's been too long.
Then serve it up.sa
It's just my bad photography: I promise that the sauce is much more appetizing in person.
Here's the recipe so that you can enjoy this too.
Chicken in Balsamic Cream Sauce
2 chicken cutlets
1 tbsp olive oil
1 tbsp butter
1 tbsp flour
2 tbsp + a dash balsamic vinegar
1/4 cup chicken stock
3 or 4 tbsp heavy cream
Salt and Pepper to taste
1. Salt and pepper chicken cutlets and pan fry in olive oil.
2. Remove the chicken and add butter and flour. Allow to cook for about two minutes.
3. Add balsamic vinegar, deglazing the pan, and allow to cook down, about one minute.
4. Add chicken stock and stir vigorously. Allow to reduce by about half (2 minutes)
5. Add heavy cream and stir again. Add salt and pepper to taste. Return cutlets to the pan and then serve as you would like.
Anyway, start by taking two chicken breasts, salt and pepper them and pan fry them.
I feel like so many of my recipes start this way. Anyway, while you're waiting gather these ingredients.
Oh, and butter... I forgot the butter. When the chicken is done, melt the butter in your pan (the same one you just took the chicken out of) and then add in your flour. For a good roux, you typically want about equal parts flour and butter. BTW, that's what we just made, a roux.
You want to cook the roux for about two or three minutes, just to get the raw flour taste out of it. Once that's done, add in your balsamic vinegar. It looks like I used about a tablespoon.
Stir it all around and try to get some of the chickeny goodness off the bottom of the pan. Then let it cook down for about a minute. We just need to allow the acid to cook down a bit. It will stop us from curdling the cream later. The fat may also do that... I'm not a chemistry person.
Perfect! Now it's time for the chicken stock. About a quarter cup will do. This is why we made the roux, so that we can get the chicken stock in our sauce to tighten up. See, it all makes sense... right?
Stir that all up and allow the stock to cook down for around 2 minutes.
Look how dark is got after that little amount of time. The balsamic is really integrated in. Now it's time for the good stuff... heavy cream. Just a tablespoon or two is probably good. I may have done three, I don't remember. Cream makes my memory hazy.
Stir all that cream in, and you will end up with something that is a brown-ish color. Not ugly brown though, smooth brown. At the end, I threw in around a half teaspoon more of balsamic, just to give it a bit of vinegar bite. It was worth it.
Damn, I love balsamic vinegar.
Something possessed me to warm up some tortillas and serve this over rice. It was a momentary thing. So, I warmed up the tortillas in the toaster. Just a minute or two on a low temperature.
Hi Mr. Toaster, it's been too long.
Then serve it up.sa
It's just my bad photography: I promise that the sauce is much more appetizing in person.
Here's the recipe so that you can enjoy this too.
Chicken in Balsamic Cream Sauce
2 chicken cutlets
1 tbsp olive oil
1 tbsp butter
1 tbsp flour
2 tbsp + a dash balsamic vinegar
1/4 cup chicken stock
3 or 4 tbsp heavy cream
Salt and Pepper to taste
1. Salt and pepper chicken cutlets and pan fry in olive oil.
2. Remove the chicken and add butter and flour. Allow to cook for about two minutes.
3. Add balsamic vinegar, deglazing the pan, and allow to cook down, about one minute.
4. Add chicken stock and stir vigorously. Allow to reduce by about half (2 minutes)
5. Add heavy cream and stir again. Add salt and pepper to taste. Return cutlets to the pan and then serve as you would like.
Labels:
balsamic vinegar,
chicken,
cream,
dinner,
FOOD,
it's been too long,
tortilla?
Monday, January 18, 2010
Thyme Chicken in a White Wine and Lemon Reduction
It sounds so fancy, doesn't it. I mean "white wine and lemon reduction". It's definitely the sort of thing that would catch my eye on the menu. It sounds refined, and it kind of is. It makes a good impression on a first date, that's for sure. It's the kind of simple recipe that will help you impress your friends, or the important person you invite over for dinner. Just remember to say the name.
So, it all starts with some boneless, skinless chicken cutlets. I get two from the grocery store and cut them in half. To do that, put one hand down on top of the cutlet and slice about half way down. It will be like butterflying the cutlet, but then cutting it all the way through.
Next up is some thyme. Thyme typically comes in bunches at the grocery store. Try to buy a bunch that looks very green. It's also not too difficult to grow English Thyme in a home garden, the seeds are pretty cheap too. If you grow LEMON THYME, that's really the best. In fact, let's be friends.
So, it all starts with some boneless, skinless chicken cutlets. I get two from the grocery store and cut them in half. To do that, put one hand down on top of the cutlet and slice about half way down. It will be like butterflying the cutlet, but then cutting it all the way through.
Next up is some thyme. Thyme typically comes in bunches at the grocery store. Try to buy a bunch that looks very green. It's also not too difficult to grow English Thyme in a home garden, the seeds are pretty cheap too. If you grow LEMON THYME, that's really the best. In fact, let's be friends.
We need to get those thyme leaves off the stems. The trick is to hold the top of each stem and, using your thumb and forefinger, pull against the grain of the leaves. They'll come right off. Then, just give them a little chop to break down any woody pieces left over.
Thyme that is allowed to mature will have many off-chutes on one large stem. You may have to rip those off before using the method above. You can then do the same thing to the smaller stems.
Now it's time to bread the chicken.
I typically have a five station set-up for this. You need three bowls and a plate. In two bowls put in flow, salt and pepper. In one of those (the last one) add in a whole lot of thyme. The third bowl get the egg wash.
Now, step 1 is to drag a chicken cutlet through the bowl with just flour, salt and pepper.
Next, it's time for a nice bath in the egg wash, which is just an egg with a tablespoon of water.
Finally, dunk that cutlet right in to the final bowl, which has all the thyme in it. Seasoning each bowl with salt and pepper ensures that each cutlet is adequately (and evenly) seasoned. It's really important.
Great, now that's done. Sorry I didn't take a picture of all the breaded cutlets, I was working with my camera phone, and the battery went low.
Some people may recommend patting the cutlets dry before you start dredging them. It's a good idea, I think it's supposed to make the crust crispier. I don't typically do it for chicken though. Beef usually gets a good pat down from me though.
Okay, so now heat some olive oil in a pan (just a 2 tablespoons) and put two chicken cutlets in (unless you can fit more... I couldn't).
Cook for 4-5 minutes on the first side, or until the flour on the bottom starts to brown. Then flip them and do another 4-5 minutes on the other side.
It looks really good. Look at all of those flecks of thyme embedded in the crust. That's going to be so good.
Now it's "reduction" time. Remove all of the cutlets to a plate lined with paper towels (not shown). Grab some butter and flour and throw them in the pan (more butter than flour). Cook it over medium heat for a minute or two until the flour just starts to brown.
You definitely want to keep it all moving. You need the flour to cook, not burn.
Now is the fun part. Take a quarter cup of either Chardonnay or Pinot Grigio and deglaze the pan.
Basically, pour it in to the hot pan, it will sizzle, and start stirring to try to get all of the chicken goodness up from the bottom of the pan.
Look at all of that steamy goodness. Sorry about the blurriness. It's my first try at an action shot. Really scrape up all of those bits from the bottom. It will color the sauce and make it taste like chicken.
Let the wine reduce over medium heat for about 3 minutes, then add in chicken stock, juice from half of a lemon, salt, pepper and thyme. Let the sauce reduce until it is the desired consistency, which is a loose sauce that you can ladle.
GREAT! So, serve it up. Chicken cutlet first, then spoon the sauce over it. I served it with some mashed cauliflower and a spinach salad. The sauce was really good over the cauliflower also.
I mean, it just looks elegant. I told you, really impressive for guests, but not that hard.
I'm leaving the recipe below so that you can try it out on your next first date. Like I said, it really worked out for me.
Oh yeah! I want to take some requests for meals you would like to see cooked, without an oven. Leave some ideas in the comments!
Thyme Chicken in a White Wine and Lemon Reduction
2 boneless skinless chicken cutlets, cut in half lengthwise
2 tbsp fresh thyme, roughly chopped
2/3 cup flour
1 egg
1 tbsp water
1 tsp salt
1/2 tsp pepper
3-4 tbsp olive oil
1/2 tbsp butter
1/4 cup Chardonnay or Pinot Grigio
1/2 lemon, juiced
1/3 cup stock
1/2 - 1 tsp fresh thyme, chopped
salt and pepper to taste
1. Put half of the flour in each of two bowls. Season each bowl with 1/2 tsp salt and 1/4 tsp pepper. Season one bowl with the fresh thyme. Beat together the egg and water in a third bowl.
2. Dredge the chicken cutlets by placing them first in the bowl of flour without thyme, then the egg wash, then the bowl with thyme. At each step, make sure the cutlet is fully covered in the contents of the bowl.
3. Heat the olive oil in a non-stick skillet. Saute the cutlets over medium high heat, about 4-5 minutes on each side, depending on the thickness of the cutlets.
4. Remove the cutlets after cooking, and add in the butter and a pinch of some of the seasoned flour. Cook over medium heat until the flour just browns.
5. Deglaze the pan with the white wine, then let reduce for 2-3 minutes over medium heat.
6. Add in chicken stock, then season with thyme, salt and pepper and let reduce over medium heat until it is the desired thickness.
7. Serve with a starch by spooning the sauce over both the chicken and the starch.
Enjoy!
Subscribe to:
Posts (Atom)