Showing posts with label recipes. Show all posts

Thursday, November 18, 2010

Tim's "Hungarian" Goulash

I learned how to make goulash from a cookbook that purported to give recipes of 1950's favorites. The only thing Hungarian about the goulash I made from it was the paprika, which I couldn't find. So, in the end, nothing Hungarian about it, but I still like calling my recipe (which is a jazzed up version of that one) by the same name.

Any way, goulash is one of those things from childhood that we all have semi-fond memories of, but have no recollection what it was like. I'm pretty sure I ate this as a child, but I have no proof. All I know is that I made this for my dad once, and he really liked it.

Anyway, let's get started. We're going to need a whole bunch of ingredients.


The only ingredient that is slightly unfamiliar in this ensemble is the stew meat. You can pick it up in your grocery store as just stew meat, but you can also just cube a top round, or a chuck steak or something. It's basically the same thing, but the store did this for me. Things like this make me miss my butchers :(.

Anyway, down to business, we also need some flour, so grab flour and the various spices you see about (paprika, allspice, and cinnamon... the secret ingredient) and combine with the flour. Don't forget the salt and pepper too!
 Now, open up the meat, and gingerly take each piece of meat and pat it dry with a paper towel.


This is really important, just ask Julia Child. It will allow the flour to stick and flavor the meat, even during frying. It will also stop some of the sizzling that happens whens water meets hot oil.

Anyway, coat each piece of meat in flour, and place aside.
Now it's time to prep the veggies. I had a GIANT green bell pepper, so I only needed half of it, but you will need a full pepper, most likely. So, slice it in half and, using your finger, scoop out the seeds and stem.
I should make an animated gif out of that or something. It might be awesome. Anyway, slice each half into fairly wide strips, and then fit your strips in to each other and cut in the other direction to get little pepper squares.
Oh yeah, and I've already slice up some onions for us. When you're done it should all look like this:
At this point, you should also mince your garlic, but more importantly, it's time to cook the meat.
Grab your dutch oven, or another large heavy bottom pot, and heat up some olive oil, enough to cover the bottom. Then, sear your meat on all sides. You'll probably need to do it in two batches, so be sure to add some more olive oil in between.

When the meat is done, take it out and drain it in a paper towel lines bowl. We're using a lot of paper towels in this recipe. Sorry environmentalists.


Don't be surprised if your meat sticks to the pan. This is a good thing. The flour is what's being left behind, with all of its seasoning. We're going to use all of that to flavor our sauce now.

Add in your sliced onion (look at all of that brown stuff on the bottom), and start them sauteing. Add some salt to help them along. Then, add in your pepper (after only two or so minutes) and let those go over medium heat for a little while, at least 8 minutes.

You really want the onions to start to carmelize, then add in your garlic. After just two minutes of letting the garlic cook, deglaze the pan with your red wine. I used Merlot here, but any wine would work. I think more tannins are better.
I love deglazing pans. Use a wooden spoon to scrape up all of those flavored bits on the bottom. I probably could have let my onions caramelize more. Do as I say, not as I do.

This is looking really good. After you let the wine reduce by about half, add in all of the beef stock. Raise the heat to let this come to a boil. You should also flavor with a lot of black pepper at this point.

After this comes to a boil, add the beef back in and let simmer over low heat for at least and hour and a half. The house is going to smell so good! The cinnamon scent is really strong here, but the flavor comes out as just a bit of interest.
About a half hour before you serve, add in 1/3 cup of grape tomatoes. They'll burst in the sauce and add some tomato flavor, which every goulash should have.


Before you serve (over egg noodles, with sour cream) make sure you taste the sauce. If it's a little flat, add some salt, and if it's bland, add a little more paprika and cinnamon. You won't regret it.

Yum! And really nice looking too! I hope you enjoy!


Tim’s “Hungarian” Goulash
Ingredients

1 1/2 lbs stew meat (or top round, cubed)
1/3 cup flour
1 tsp paprika
1 tsp ground cinnamon
1/2 tsp allspice
1/2 large onion, sliced
3 cloves garlic, minced
1 large pepper, diced
1/2 cup red wine
1 qt beef broth
2 tbsp olive oil
1/3 cup grape tomatoes
Salt & pepper
Sour cream

1. Combine flour and spices together in a bowl, then coat the meat in the flour mixture. Shaking in a plastic bag works well here.

2. In a dutch oven (or other larger heavy bottomed pot), sear the meat on all sides over medium high heat.. If the pot is not large enough, do the meat in two batches and add a little olive oil between.

3. Remove the meat to a paper towel-lined bowl to drain. Lower heat to medium or medium low. Add in onions and pepper, sauté for 8 minutes, until onions just start to carmelize.

4. Add in garlic at the last minute and let cook for about 2 more minutes. Then, deglaze the pan with the red wine.

5. All the red wine to reduce for about 5 minutes, then add in the beef broth, along with a healthy sprinkling of salt and pepper. Allow to come to a boil over medium heat.

6. Return meat to broth mixture and let simmer for 1½ hours.

7. After an hour, add in the tomatoes, stir them in and let it continue to simmer.

8. Serve over egg noodles with a dollop of sour cream.


    Thursday, September 16, 2010

    Pesto Chicken over Polenta: Part II

    I know I said that I would post this recipe last week, but I'm lazy and you should never trust anything I say.

    Anyway, this is the second part of the recipe I started before, the actual chicken part. I'm still deciding if I will include the polenta part too, but I just use Mark Bittman's recipe, and it's really easy. Maybe I'll do something else soon that uses it. I've wanted to try out the recipe for really stiff polenta and make little cakes.

    Anyway, on to chicken. I'm excited because today is my oven's debut on this blog! This is everything that you need, including stuff for polenta.
    The grape tomatoes are a really great addition in this recipe, so don't forget them. Also, chicken thighs here are a must. Breasts will get too dry, but thighs can take a lot of cooking.

    First remember to season the chicken thighs (profusely) with salt and pepper. Add a tablespoon of butter and about a tablespoon of olive oil to a dutch oven. Butter for browning, olive oil for not burning.
    When it gets hot, add the thighs, skin side down, in the pan.
    Let them cook for about two to three minutes, until you get some nice color on the skin. If you like it really crispy, go for four. Anyway, when you flip them, they should look something like this.
    Nice color on the skin, but not burnt. Although, I did burn myself getting this close-up. I really need a new camera.

    So, two to three minutes on the other side, then pop them out, put them on a paper towel an drain some of the fat if it looks like there's too much. Also, start preheating your oven to 325.
    Whenever I make sauces I like to add onion, and I'm not sure why. If I make a pan sauce and I don't, I always feel like something is missing. Maybe it's because of my ultimate in pan sauces, the sauce for my Pork Chops in Mustard Cream Sauce. I'm just obsessed with it, and I try to make every sauce jutst like it. Anyway, throw in some nicely diced onion, turn off the heat, and let it cook until translucent. The residual heat here should be enough, and I HATE burning onions.

    Now the fun part, turn the heat back on medium, take a quarter cup of wine and deglaze the pan.
    That just means pour in the wine and stir vigorously, getting all of the chickeniness off the bottom of the pan. It adds tons of flavor and does some of the cleaning for you.
    Let the wine reduce by about half, then add in a quarter cup of chicken stock (or water, if you don't have any) and let that reduce by half.

    Add in between one and two tablespoons of that great pesto we made before and mix it all in.
    It looks really gross, but tastes great. Turn off the heat and taste for seasoning. Add salt and pepper as needed.
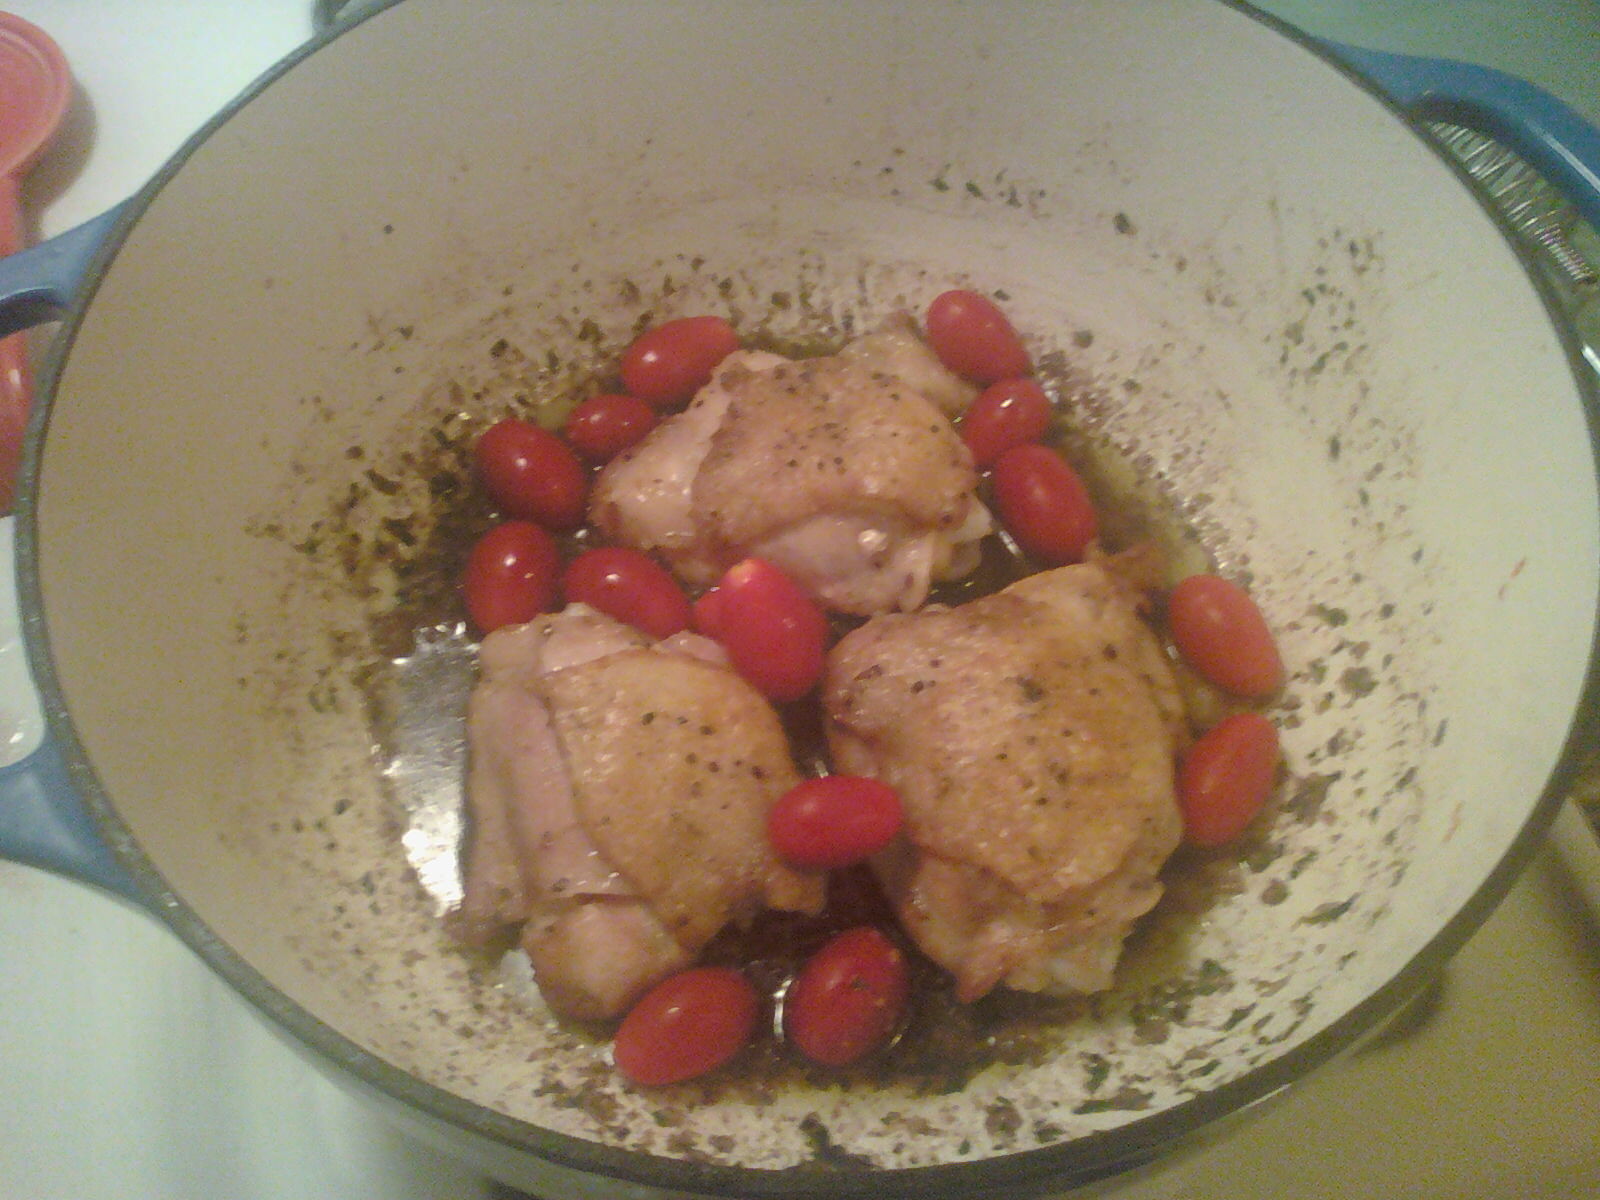
    Put the chicken back in, skin side up, and toss in some of those grape tomatoes.
    The tomatoes are going to start to burst in the oven and add another layer of flavor to the sauce, not to mention the chicken will let off additional juice/fat. It's going to be sooo good.

    Put the top on and get it in the oven for 35-45 minutes, until you feel comfortable with the chicken. 35 was definitely enough for me.

    While it's in the oven, you have enough time to make polenta, if you're in to it. Mashed potatoes would also be good, but do me a favor and make a cute presentation.
    I tried my best with this one. At least it tasted great. This one's for the recipe book.

    Pesto Chicken
    3 Chicken Thighs
    1/4 cup red wine
    1 tbsp butter
    1 tsbp oil
    1/4 cup chicken stock/water
    2 tbsp pesto
    2 tbsp onion, diced
    1 handful grape tomatoes
    salt and pepper as needed

    1. Season chicken thighs, and heat butter and oil in a dutch oven. Sear, skin side first, 2-3 minutes per side.
    2. Remove to a paper towel, drain some fat if necessary, turn off the heat, and saute onions in residual heat. Preheat oven to 325.
    3. Turn heat back to medium, add red wine to deglaze pan and let reduce by half. Then add stock and let reduce again.
    4. Mix in pesto, then turn off heat.
    5. Add chicken back into dutch oven, skin side up, and toss in grape tomatoes. Place in oven, covered, for 35 minutes.
    6. Serve over polenta or mashed potatoes, and most importantly, some red wine.

    Thursday, February 18, 2010

    Pork Chops in a Mustard Cream Sauce

    Three weeks ago I went to the butcher and saw center cut pork chops on sale ($3.99/lb, so good), so naturally I snatched up two for a date night dinner with my girlfriend. Sadly, we both had the same not so fond memories of how our moms cooked the chops when we were kids. My mom always breaded them and baked the heck out of them in the oven, not delicious.

    After doing some searching on the internet for a good recipe, looking for good mustard sauce or crust for the chops that wouldn't require an oven, we found this recipe on the Food and Wine website. It only required a little tweaking (they finish the chops in the oven), and we were able to make it just on the stove. The results were amazing! We've never had pork chops that tasted so much like... well... pork. I don't think you have either. The sauce is actually a classic French sauce, I'm just not sure which one it is. Any idea?

    First, it all starts with our pork chops. They're really the star of this show.

     
    Season them liberally with salf and pepper on both sides and make sure to rub it in a little bit.
     
    Heat up a few tablespoons of oil in a skillet, until it's shimmering, but not smoking. You can tell if it's ready by spritzing water on it. If the water spatters and evaporates, then the oil is ready. When that happens, it's time to put the chops in.
     
    Make sure that the oil is really THAT hot, we want to make nice sear on the pork. You should cook the chops for about six minutes on each side, or until nice and golden brown. You'll see what I mean in a minute.
    While that is cooking on the first side, gather the ingredients for the sauce.

    You'll need to dice half of a shallot. I didn't have any and the ones in the vegetable market looked bad, so I used a quarter of a small onion. (The sauce was a little too sharp, I really do recommend the shallots)
     
    You'll also need to gather the following ingredients.
     
    Chicken stock, red wine vinegar, heavy cream (YUM) and dijon mustard. I may have forgotten something, we'll see in a bit.
    By now, your first six minutes is up, so you need to flip over the pork chops.

     
    Look at that nice sear, it's going to taste delicious. Also, some of the fat on the outside of the chop has melted in to the oil, it will make for really good sauce!
    After six minutes on the second side, take the chops out of the pan and let them rest. I tent some aluminum foil over a plate for this, just to keep them warm.

    At this point, I turn off the heat in the pan, because it's REALLY hot still. Then, toss in your diced shallot (or in my case, onion).

     
    Let it cook for about 3 minutes, until the onions get tender. I overcooked mine a little and they started the caramelize. It was still okay, until they started burning.

     
    This is the point where I turn the flame back on to medium, and add in the red wine vinegar. Really stir it around vigorously in the pan with a wooden spoon. You want to scrape all of the brown bits up off the bottom.

     
    See, onions starting to burn... bad time. It will take the vinegar less than a minute to evaporate, so have your next ingredient ready, chicken stock. Add it to the pan and let it reduce by half. It should take about three minutes.

    Ouch, more burning onions and blurry picture. Double bad. So, when that's done, add the cream, making sure that the flame is low. You don't want it to boil, you just want to warm it through.
     
    When the cream has reduced just a little bit, add in the dijon mustard and stir. That's really what the above picture is. That should be the consistency of your final sauce. It looks so good.
    You can add some salt and pepper to taste, but if you seasoned the chops well enough, you won't need it.

    Serve up the pork chops smothered in the delectable sauce. You probably want something starchy to sop it all up. Not a drop should be wasted, it's liquid crack.


    Really, it's so good, there's almost a heavenly glow around it. I promise, it's not just my bad camera skills. HEAVENLY GLOW. It's that wonderful.
    Here's a recipe so that you can experience it all on your own.

    Pork Chops with Mustard Cream Sauce (adapted from Food and Wine Magazine)

    2 center cut pork chops, about an inch thick
    salt and pepper
    1-1/2 tsbp olive oil
    1/2 shallot, finely chopped (or 1/4 small onion, diced)
    1 tbsp red wine vinegar
    1/4 cup chicken stock
    1/4 cup heavy cream
    ~1 tbsp dijon mustard

    1. Season pork chops liberally with salt and pepper while heating oil in a large skillet over medium high heat.

    2. When oil is shimmering, but not smoking, add in pork chops, cook for six minutes on each side, then remove and let rest.

    3. Turn off the heat and add the shallot, sauteing it using just the residual heat in the pan.

    4. Turn flame back on to medium or medium low and deglaze the pan using the red wine vinegar. Allow to evaporate completely, which will take about 30 seconds.

    5. Add in chicken stock, stirring with a wooden spoon to make sure that you are mixing in all of the bits from the bottom of the pan. Let reduce by half, which will take about 2 or 3 minutes.

    6. Turn head to medium low and add the cream. Let reduce slightly, about 2 minutes, then add in dijon mustard an stir.

    7. Return chops to the pan and just turn them over to coat in sauce. Add parsley for garnish if you want. Serve with some starch to absorb sauce, but don't think you're too good for licking your fingers.

    Enjoy!


    Thursday, January 28, 2010

    Roasted Garlic Bread

    This bread was my first experiment with yeast breads in the toaster oven, the results were delicious. I mean, put together freshly made french bread and roasted garlic... what could possibly go wrong?

    Most people, I think, are a little afraid of making bread. They think that it's complicated and takes forever. Well, it's actually pretty simple, but it does take a few hours, though you're pretty inactive during most of it. Also, nothing smells as good as yeast bread when it's rising and baking.

    So, we start off with a very small number of ingredients.

    Just flour, olive oil, garlic, dry active yeast, and water. You'll need two bowls, one big and one small, and some aluminum foil.

    First thing we need to do is roast the garlic. So, take three cloves from the head, chop off their tops, and put them on your sheet of aluminum foil.

     
    Pour about 2 teaspoon to a tablespoon of oil over the cloves and I added just a little salt. Fold up the foil in to a nice packet, just like I did. Put it in a 400 degree oven for 30 minutes.

    In the meantime, we need to activate the yeast. Take 3/4 of a cup of "tepid" water, which means just warm to the touch and put in your small bowl, then add in about half of the package of yeast and stir it up.

     
    Half of a package is about 1 1/4 teaspoons. Now, add in a pinch of flour to feed those yeast and let it sit out for a while. I mean, you're hungry when you wake up, so are the yeast.


    The reason it is REALLY important to use tepid water is that yeast are most active at just above body temperature, they evolved that way. So, if the water feels warm to the touch (but not hot), then it's probably good. Too hot and you'll kill the yeast, too cold and they won't all activate. Plus, we're prepping the yeast so that they multiply and make the bread rise so be nice to the little guys.

    To make sure that I do the water right I put in the water in three stages, changing from cool to warm, then warm to warmer... but not quite hot. I'm also just neurotic about the temperature at this stae.

    So, put the yeast aside for the half hour until the garlic is done. Easy enough.

    When the garlic is done, take it out and let it cool.
     
    You're going to be handling and mashing it in a little bit.

    We get together our dry team. First comes flour and salt.

    Then add in about a tablespoon of olive oil, for good measure.

     
    Mix it around really nicely, and then make a big crater in the center of the bowl, like so.

    Now the fun part, pour in the yeast/water combo. Right before I pour, I just give it a little stir.


    Stir it up, with a wooden spoon or your hands, then mash in the garlic, using your fingers to squeeze the clove out, then crushing it between your thumb and forefinger. I also pour in the extra oil in the foil. When you're done, it will be a big sticky mess, that means it's time to knead. I think everyone is afraid of kneading, but I think it's tons of fun (for the first two minutes or so)

    First thing's first. Sprinkle flour all over a wooden board, or whatever surface you'll be kneading on. Then, turn the dough out of bowl onto the surface. Flour your hands, the top of the dough, everything in sight. This dough could be really sticky. Also, keep a knife nearby, just in case.


    To knead, place the butt of your hand in the middle of the dough ball and push away from you. Do it gently, you don't want to rip the ball, just work it a little bit. 

    After the push, fold the ball over on itself and repeat the process.

    Working the dough like this produces a net of gluten in the bread, and also mixes in more flour. Basically, every time you push out and fold over, sprinkle the top of the ball with flour again, to stop it from sticking to you, and to add more to the mix. Also, the more gluten in your bread, the more structure. Too much and the bread will be tough though. So, you want to knead the dough for about 5 minutes, or until it makes a nice elastic ball, like this.

     
    The outside of the bread is smooth and the ball is holding together, but it has small imperfections that suggest that it hasn't been overworked. I'm patting myself on the back for this one.
     
    Oh, I forgot about the knife. If the dough sticks to your board, use you knife to scrape it up, that's really all it's for.

    I wash out my mixing bowl at this point, oil it and put the dough back in. Cover the bowl with a dish towel and let it sit in the warmest part of your kitchen for an hour. I put it on top of the toaster over where I just roasted the garlic, that's pretty warm. The dough should about double in size in this time and look like this.


    Now everyone's favorite part. Turn the risen dough out on to your board and punch it down.

     
    You're basically knocking some of the air out so that you can form a loaf. If you're cooking miniloaves, cut the flattened dough in half.

    Now, using the butt of your hand, push the dough in to a rough rectangle.

    Then, fold in the long sides of the rectangle and pinch off the seam.


    Fold under the excess on sides and then slide that baby right in to a greased loaf pan. This will give the top of the loaf that nice shape we all expect from our bread and make sure that it takes up the whole loaf pan. You could also try braiding the dough, but I've never done that, and I wasn't about to try this time around.


    Put your loaf pans back under a dish towel in the warmest part of your kitchen again and let them rise for another hour. The bread will rise again!

     
    Great! These loaves look like they've risen a whole lot. Let's bake them in a 350 degree oven for 35 minutes now, until the tops are browned. It will smell delicious, you just have to control yourself though.

    When they come out, flip the loaf pan upside down to get the bread out, then let it cool (just for a minute) before eating. Warm bread is really the best though, so don't let it go for too long.


    Look at them, just beautiful. Delicious with a meal that involves some marinara sauce. I want more of this bread NOW! Too bad I have to work and go to class and stuff. If I don't succeed as a Mathematician, baker may have to be my career path. I'd get so fat though...

    Roasted Garlic Bread
    3 cloves garlic
    2 cups flour, plus more for kneading
    3/4 cup tepid water
    1 1/2 tsp salt
    2 tbsp olive oil
    1 1/4 tsp dry active yeast

    1. Roast the garlic by wrapping up the cloves of garlic, with tops cut off, in aluminum foil with 1 tbsp olive oil and 1/2 tsp salt. Put it in a 400 degree oven for 30 miuntes.

    2. Prep the yeast by combining the dry active yeast with the tepid water an a pinch of flour. Stir until the yeast dissolves.

    3. When the garlic is done, combine the flour, 1 tsp salt, and 1 tbsp oil in a large mixing bowl, creating a crater in the center.

    4. Add in the yeast mixture and stir, using a wooden spoon. When the ingredients are just combined, mash the roasted garlic and mix in.

    5. Knead the dough for 5 - 8 minutes, adding flour as needed.

    6. Let rise for an hour in a warm place, then punch the dough down and form in to loaves

    7. Let the dough rise in the loaf pans for another hour, then place in a 350 degree oven for 35 minutes.

    Enjoy!